Automating KeyCloak deployment
How to customize a keycloak docker image and automate deployment and realm management on kubernetes using Helm charts
In my last post, I wrote very briefly about choosing KeyCloak as my IAM solution. Today, I will explain how I have integrated KeyCloak into the CI/CD process.
Because there are a ton of options in KeyCloak configuration, it is very important to document the settings required for a new deployment. Also, when you have to make many new deployments for new tenants / environments, manually modifying these settings can become tedious. We will tackle both these requirements by automating the KeyCloak deployment and configuration.
KeyCloak configuration - preparing the JSON files
In order to automate keycloak deployment, first, we have to make sure all the required settings for realms, clients, users, IdPs are available as text files, so that they can be parameterized and deployed multiple times.
- Run keycloak locally (maybe as docker image, no need to even set up a database if you know what you are doing or are experimenting)
- Configure one or two realms manually, as needed. For example, I configured the master realm and one other realm for my application.
- Export each realm into its own .json file using the
/opt/jboss/keycloak/bin/standalone.shand using themigration.action=exportAn example gist is provided here. - You will see that the .json file is huge and has many defaults. I removed most of the data as keycloak fills the defaults (take care on upgrades, you might want to avoid surprises in case the defaults get changed).
After my edits, Here's what my master realm .json looks like:
{
    "enabled": true,
    "realm": "master",
    "accessTokenLifespan" : 3600,
    "smtpServer": {
      "from": "support@mycorp.com",
      "host": "smtp.sendgrid.net",
      "auth": true,
      "user": "apikey",
      "password": "#{sendgridKey}"
    },
    "emailTheme" : "mytheme",
    "identityProviders" : [ {
      "alias" : "company-oidc",
      "displayName" : "MyCorp",
      "providerId" : "oidc",
      "enabled" : true,
      "updateProfileFirstLoginMode" : "on",
      "trustEmail" : false,
      "storeToken" : false,
      "addReadTokenRoleOnCreate" : false,
      "authenticateByDefault" : false,
      "linkOnly" : false,
      "firstBrokerLoginFlowAlias" : "Existing User First Login",
      "config" : {
        "userInfoUrl" : "https://graph.microsoft.com/oidc/userinfo",
        "validateSignature" : "true",
        "clientId" : "#{mycorpaadAppClientId}",
        "tokenUrl" : "https://login.microsoftonline.com/#{azureTenantId}/oauth2/v2.0/token",
        "jwksUrl" : "https://login.microsoftonline.com/#{azureTenantId}/discovery/v2.0/keys",
        "issuer" : "https://login.microsoftonline.com/#{azureTenantId}/v2.0",
        "useJwksUrl" : "true",
        "authorizationUrl" : "https://login.microsoftonline.com/#{azureTenantId}/oauth2/v2.0/authorize",
        "clientAuthMethod" : "client_secret_post",
        "logoutUrl" : "https://login.microsoftonline.com/#{azureTenantId}/oauth2/v2.0/logout",
        "syncMode" : "IMPORT",
        "clientSecret" : "#{mycorpaadAppClientSecret}"
      }
    } ],
    "authenticationFlows" : [ {
      "alias": "Existing User First Login",
      "description": "",
      "providerId": "basic-flow",
      "topLevel": true,
      "builtIn": false,
      "authenticationExecutions": [
        {
          "authenticator": "idp-detect-existing-broker-user",
          "authenticatorFlow": false,
          "requirement": "REQUIRED",
          "priority": 0,
          "userSetupAllowed": false,
          "autheticatorFlow": false
        },
        {
          "authenticator": "idp-auto-link",
          "authenticatorFlow": false,
          "requirement": "REQUIRED",
          "priority": 1,
          "userSetupAllowed": false,
          "autheticatorFlow": false
        }
      ]
    },
    {
      "alias" : "browser",
      "description" : "browser based authentication",
      "providerId" : "basic-flow",
      "topLevel" : true,
      "builtIn" : true,
      "authenticationExecutions" : [ {
        "authenticator" : "auth-cookie",
        "authenticatorFlow" : false,
        "requirement" : "ALTERNATIVE",
        "priority" : 10,
        "userSetupAllowed" : false,
        "autheticatorFlow" : false
      }, {
        "authenticator" : "auth-spnego",
        "authenticatorFlow" : false,
        "requirement" : "DISABLED",
        "priority" : 20,
        "userSetupAllowed" : false,
        "autheticatorFlow" : false
      }, {
        "authenticatorConfig" : "mycorpaad",
        "authenticator" : "identity-provider-redirector",
        "authenticatorFlow" : false,
        "requirement" : "ALTERNATIVE",
        "priority" : 25,
        "userSetupAllowed" : false,
        "autheticatorFlow" : false
      }, {
        "authenticatorFlow" : true,
        "requirement" : "REQUIRED",
        "priority" : 30,
        "flowAlias" : "forms",
        "userSetupAllowed" : false,
        "autheticatorFlow" : true
      } ]
    }],
    "authenticatorConfig" : [ {
      "alias" : "mycorpaad",
      "config" : {
        "defaultProvider" : "mycorpaad-oidc"
      }
    }],
    "users" : [ {
      "username" : "me@mycorp.com",
      "enabled" : true,
      "email" : "me@mycorp.com",
      "realmRoles" : [ "admin", "default-roles-master" ]
    }]
}
I have connected Azure AD so that I can use that to login to keycloak admin console, rather than a username and password. Note that the file is much smaller than what gets exported. There are also substitution markers placed (e.g.: #{sendgridKey}) which have to be replaced during deployment.
Lastly, commit this file, and repeat this for the application realm.
Build - Custom docker image creation
Now that the json files are in place, let's create a custom keycloak docker image. The original keycloak image resides in jboss/keycloak in dockerhub. We would most likely need to customize the themes, hence we are customizing the image based on this image. Quite straight forward.
FROM jboss/keycloak:15.1.0 AS base
WORKDIR /opt/jboss/keycloak
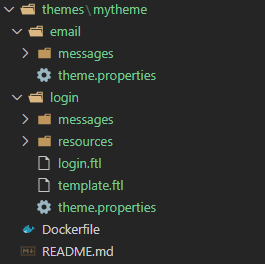
COPY themes ./themes
Hopefully this folder structure gives some idea of how files are organized.
Deployment - Helm chart creation
Once we have a dockerfile, we will now create a helm chart to deploy this to kubernetes. We can start with helm init and proceed with chart creation. Here are the most important parts to consider.
You want to run KeyCloak as a Deployment or DaemonSet, and not as a pod. The relevant portions of the pod spec could be something like this:
 spec:
  securityContext:
    runAsNonRoot: true
    runAsUser: 1000
    runAsGroup: 1000
    fsGroup: 1000
  containers:
  - name: {{ .Chart.Name }}
    image: "{{ .Values.image.name }}"
    imagePullPolicy: {{ .Values.image.pullPolicy }}
    securityContext:
      allowPrivilegeEscalation: false
      privileged: false
    env:
      - name: PROXY_ADDRESS_FORWARDING
        value: "true"
      - name: DB_VENDOR
        value: "mssql"
      {{- $lines := splitList ";" .Values.dbConnectionString -}}
      {{- range $lines }}
      {{- $kv := . | splitn "=" 2 -}}
      {{- if eq $kv._0 "Server" }}
      {{ printf "- name: DB_ADDR" }}
      {{ printf "value: %s" ($kv._1 | trim | quote ) | indent 2 }}
      {{- else if eq $kv._0 "Initial Catalog" }}
      {{ printf "- name: DB_DATABASE" }}
      {{ printf "value: %s" ($kv._1 | trim | quote ) | indent 2 }}
      {{- else if eq $kv._0 "User ID" }}
      {{ printf "- name: DB_USER" }}
      {{ printf "value: %s" ($kv._1 | trim | quote ) | indent 2 }}
      {{- else if eq $kv._0 "Password" }}
      {{ printf "- name: DB_PASSWORD" }}
      {{ printf "value: %s" ($kv._1 | trim | quote ) | indent 2 }}
      {{- else }}
      {{- end }}
      {{- end }}
      - name: KEYCLOAK_USER
        value: {{ .Values.adminUsername }}
      - name: KEYCLOAK_PASSWORD
        value: {{ .Values.adminPassword }}
    ports:
    - name: http
      containerPort: {{ .Values.containerPort }}
      protocol: TCP
    livenessProbe:
      httpGet:
        path: /auth/realms/master
        port: http
      initialDelaySeconds: 20
      periodSeconds: 120
      failureThreshold: 10
      timeoutSeconds: 10
    startupProbe:
      httpGet:
        path: /auth/realms/master
        port: http
      periodSeconds: 10
      failureThreshold: 30
    resources:
      requests:
        memory: {{ .Values.memory }}
        cpu: {{ .Values.cpu }}
      limits:
        memory: {{ .Values.memory }}
        cpu: {{ .Values.cpu }}
  {{ if not .Values.global.useAzure }}
  imagePullSecrets:
  - name: registry-creds
  {{ end }}
  restartPolicy: Always
Note that I'm using MSSQL as the database, and I take the connection string from values.yaml and parse it appropriately to get the different environment variables needed for keycloak.
For the first time, it runs on a blank database, and all the schema gets created. The second time onward it checks whether the schema is in sync.
Make sure to create a service and ingress as needed.
NOTE! Do not upgrade the keycloak base image version without testing. There could be breaking schema changes.
Deployment - Configuring Azure DevOps
The next step is to to deploy the helm chart that we created above. But that is not enough. We need to also automate realm creation, maybe client and user creation etc.
STAGE 1 - Master realm
- Deploy the helm chart - use the standard
helm upgradecommand. - Configure the master realm - use the adorsys/keycloak-config-cli to import the master realm .json file that we have created earlier.
docker run --rm \
    -e KEYCLOAK_URL=https://$(keycloakHostName)/auth \
    -e KEYCLOAK_USER=$(adminUsername) \
    -e KEYCLOAK_PASSWORD=$(adminPassword) \
    -e KEYCLOAK_AVAILABILITYCHECK_ENABLED=true \
    -e KEYCLOAK_AVAILABILITYCHECK_TIMEOUT=120s \
    -e IMPORT_PATH=/config \
    -e IMPORT_FORCE=false \
    -v <path_to_dir_with_master.json>:/config \
    adorsys/keycloak-config-cli:latest
This stage needs to be re-run only if there is change in master realm details, or change in themes or base images, etc.
STAGE 2 - App realm
- Configure other realms, using the same method as step 2 above.
I use one realm for each environment and tenant combination. For example, customer1 might need username password option, whereas customer2 might need AD integration. So my realm files are also created one per customer.
Again, a snap of my folder structure to visualize the entire thing:
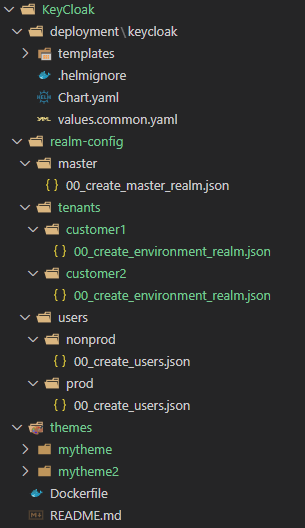
You can import more files as needed. For example, here's a file to just create default users in non-prod environments:
{
    "enabled": true,
    "realm": "#{realmName}",
    "users" : [
    {"username" : "abc@mycorp.com", "enabled" : true, "email" : "abc@mycorp.com", "attributes" : {"roles" : [ "admin" ]}},
    {"username" : "xyz@mycorp.com", "enabled" : true, "email" : "xyz@mycorp.com", "attributes" : {"roles" : [ "admin" ]}}
  ]
}
I import this file after the realm has been created.
That's it. There are finer details of the implementation that I've skipped, but I hope this post has been sufficiently detailed enough to point you in the right direction.
Please like and share if this post has been helpful.